Solar PV in the Hamilton Trenches
In the beginning ...
On Friday, June 22, 2012 I received an email from the Ontario Power Authority (OPA) congratulating me on having been approved for a solar PV system installation on my home.I applied in January 2011, over a year and a half ago, but didn't contact my Local Distribution Company (LDC) until April 2011. I also didn't push or follow up during any stage of the process ... just to experience how it might pan out.
In October 2011, concern over the outcome of the provincial election resulted in Feed-in Tariff Program uncertainty, which delayed the scheduled review of the program. Since then, the program has been under review with no updates other that the Review Report (issued in late March 2012) and draft rules and regulations (posted in early April 2012).
Though nothing has been formally announced and neither the online FIT nor microFIT web-based portal appear 'open for business', I assume that I am not the only one to have recently received a Conditional microFIT Contract from the OPA.
I plan to document the entire process through this blog!
July 12, 2012 UPDATE
OPA Official Announcement: "We are pleased to advise that the window for microFIT applications is now open." Here's the link to the microFIT portal for new-comers to the program to Register and then submit an applicationDon't hesitate to contact me if you need help with the application process and/or want to know more about the Feed-in Tariff Program or other ways through which you can become an electricity generator. I can also help in estimating the potential generation capacity (i.e., kWh/mn) and in developing the design of a Solar PV system installed on your home or business. I plan to complete the study on my own home next week and will post pictures & findings.
Special Note
Those who submitted an application for a microFIT project after September 1, 2011, will need to resubmit their application according to the instructions posted here
December 1, 2012 UPDATE
After the big move to Nova Scotia got delayed, I decided to go ahead with my solar PV MicroFIT project!!The system will be a roof-mounted solar PV array on a 1100 square foot, 1.5 storey house in a densely housed neighbourhood in Central Hamilton ON Canada. It's nameplate will be 4.24 kW [DC] ~ 3.44 kW [AC]. It will be comprised of two (2) 8 module/micro-inverter AC branches, center-fed into a roof-mounted combiner box. The solar PV modules will be Silfab 265W monocrystaline and the system will use Enphase M215 micro-inverters.
Technical details & pictures to follow ...
December 17, 2012 UPDATE
So this is the site. The aerial image on left is of the house (yellow box) and surrounding neighbourhood. The image on the right illustrates the south-east facing roof surfaces of the house. The south-west facing portion of the roof at the front of the house was considered to be excessively shaded by the tree in front of the neighbour's house to the south.


Site Assessment
Designing a solar PV system is an iterative process, starting with the following preliminary checks:
- Roof Surface Orientation
- Available roof surface(s) should face S, SE, or SW. While due east - or west - oriented surfaces will also capture solar irradiation, they will produce considerably less. [See Tools section below to explore the effects of both roof orientation & pitch on incident solar irradiation]
- Roof Pitch
- Available roof surfaces should (ideally) be at a pitch of the latitude of the location +/- 15°. [See Tools section below to explore the effects of both roof orientation & pitch on incident solar irradiation]
- Roofing Material Condition
- Consider replacing the roofing material on a roof if it is comprised of asphalt shingles > 10 years old, prior to installing any roof-mounted equipment.
- Structural Assessment
- Consider contracting a structural engineering firm to confirm the load bearing capability of the roof rafters or trusses.
- Shading Analysis
- Identify roof areas where shading will be excessively detrimental i.e., we are seeking unshaded solar access from 9AM - 3AM throughout the year. [See Tools section below to obtain a sun path chart for a location based on it's Lat/Long coordinates (see Step 2.) and other shade analysis hardware & software]
- System Size [kW] & Generation [kWh]
- Evaluate roof area & dimensions vs. solar module size (length & width) vs. solar module mounting orientation (i.e., landscape vs. portrait).
- There are numerous solar modules on the market of varying nameplate (i.e., Watts [W] per module) and size (i.e., length, width, and thickness).
- Standard modules for generating electricity for commercial buildings, small businesses, houses, etc. typically range in nameplate from 200+ W to 300+ W.
- The larger nameplate modules are usually similar in width (e.g., ~ 39") but greater in length (e.g., ~ 78" vs. 65").
- The nameplate of the solar PV system (i.e., a collection of solar modules) that can fit on the designated roof surface(s) is especially important for those designing an Off-Grid system.
- Such a system needs to be designed to meet electrical consumption [kWh/day]. This electrical consumption figure needs to be converted into an Ah/day consumption amount (For example: Given that Volts [V] x Amps [A] = Watts [W], kWh/day times 1000 W/kW divided by system voltage of 120 V = Ah/day). From there, a battery bank needs to be configured that can meet the Ah/day consumption with 'X' days of back-up, and a solar PV system needs to be designed that can charge such a battery bank.
- Off-grid system design should start with an Energy Audit to identify sources of energy inefficiency and quantify the electricity actually being consumed.
- An Energy Audit will save money by reducing demand through identifying ways to improve building envelope efficiencies, which impact heating and cooling electrical demands, identifying inefficient appliances (e.g. furnace, A/C, fridge, freezer, stove, lighting, etc.), and educating on energy efficient practices, allowing for the design and installation of a 'right-sized' system that can actually meet the 'true' electrical demand.
- For Feed-in Tariff and/or Net-Metered systems, generation capacity will assist in determining the economic feasibility of the project, should payback and/or ROI be of importance during this era of electrical supply instability and utility industry $/kWh price - point uncertainty and historical increases.
- System Configuration:
- Using the findings from Step 6., truss and/or rafter locations vs. allowable mounting rail cantilever (as recommended by rail manufacturers), and solar module mounting point dimensions, fine tune the design of the system to determine number and length of rails required and the actual number of solar modules that can be mounted.
- There are a myriad of roof-mount and ground-mount racking system manufacturers. DIYers can start their search through the Canadian Solar Industries Association (CanSIA), while there are many other manufacturers who are not necessarily CanSIA members.
- Alternatively, consider contacting a local system installation company as identified through CanSIA, or, if you are located in the Hamilton area, consider contacting EcoDomus Consulting
- Sunpath Charts can be obtained through the University of Oregon's online SunChartProgram

- Hardware for capturing shadow casting objects & software for calculating shading impact:

- Determine coordinates of a location based on street address using Geocoder
- Explore solar irradiation vs. orientation & pitch
System Design
To decide between micro-inverters [M] (i.e., 1 inverter per solar module) and string inverter(s) [S] (i.e., 1 inverter per group of solar modules), the following should be considered:
- Is there shading in some areas and not others? [M]
- Are solar modules being mounted on multiple roof surfaces at different orientations and/or pitches? [M]
- Are a mix of different nameplate / manufacturer solar modules being used within the same system? [M]
- Will the system be expanded over time? [M]
- Is the system a demonstration system with interest in observing per solar module - level monitoring? [M]
- Will the system be off-grid? [S]
At the time of this posting, micro-inverters on the Ontario market are not able to operate in off-grid applications. They are designed to be grid-connect compliant (i.e., they need to monitor the grid, which requires them to draw electricity from the grid in order to operate). This power consumption is minimal and required for the operation of the safety-related feature of grid-tied inverters. Grid-tied inverters are required to shut down when the electrical grid to which they are connected becomes disabled so that electricity is not being fed in while the system operators are working on repairs.
As such, these micro-inverters cannot easily, currently, be used for off-grid applications. There are probably ways to use them but converting solar module direct current (DC) electricity to the alternating current (AC) required to feed into the electrical grid using an inverter only to need to convert back to DC in order to charge the battery bank is a waste of energy due to the inherent inefficiencies of the DC-AC-DC conversion process.
For this demonstrator site with same orientation, but different pitch roof sections and shading issues, micro-inverters were selected.
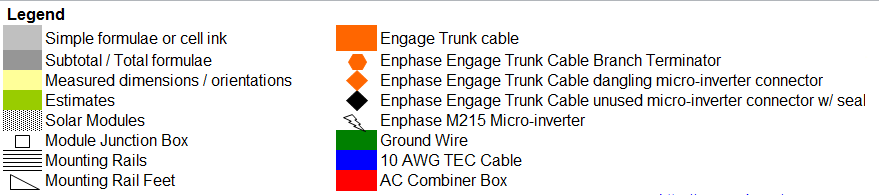
So here is the layout for the two roof surfaces:
Main Roof 2.1 kW branch

Dormer Roof 2.1 kW Branch

Keep tuned for more ...
December 19, 2012 UPDATE
It took only eight (8) days from system design to receipt of OPA “Connection Completion” message!
The site assessment & system design were conducted by Ruth Cooper of EcoDomus Consulting. The racking, micro-inverters, and solar PV modules were supplied by Sentinel Solar. The Master Installer with micro-inverter expertise was Mihai Roibu (Rombro Solar Energy Inc.) assisted by Ruth. The Master Electrician was Dario Pilot of Current Solutions. The ESA Inspector was Mike Szabo and the utility company, otherwise known as a Local Distribution Company (LDC), contact was Vito Genovese of Horizon Utilities (HU) who made this all possible in such a short time frame. HU's Metering Department contact, Dominique, and the disconnect / reconnect crew were fabulous!
Check into this blog soon for a continuation of this post to be title "Solar PV for your Home - Part II" within which we will cover other lessor known parts of the system i.e., combiner box(es), disconnect(s), meter bas(es), etc. We will also talk about system performance challenges due to the weather and the design of the system.
No comments:
Post a Comment